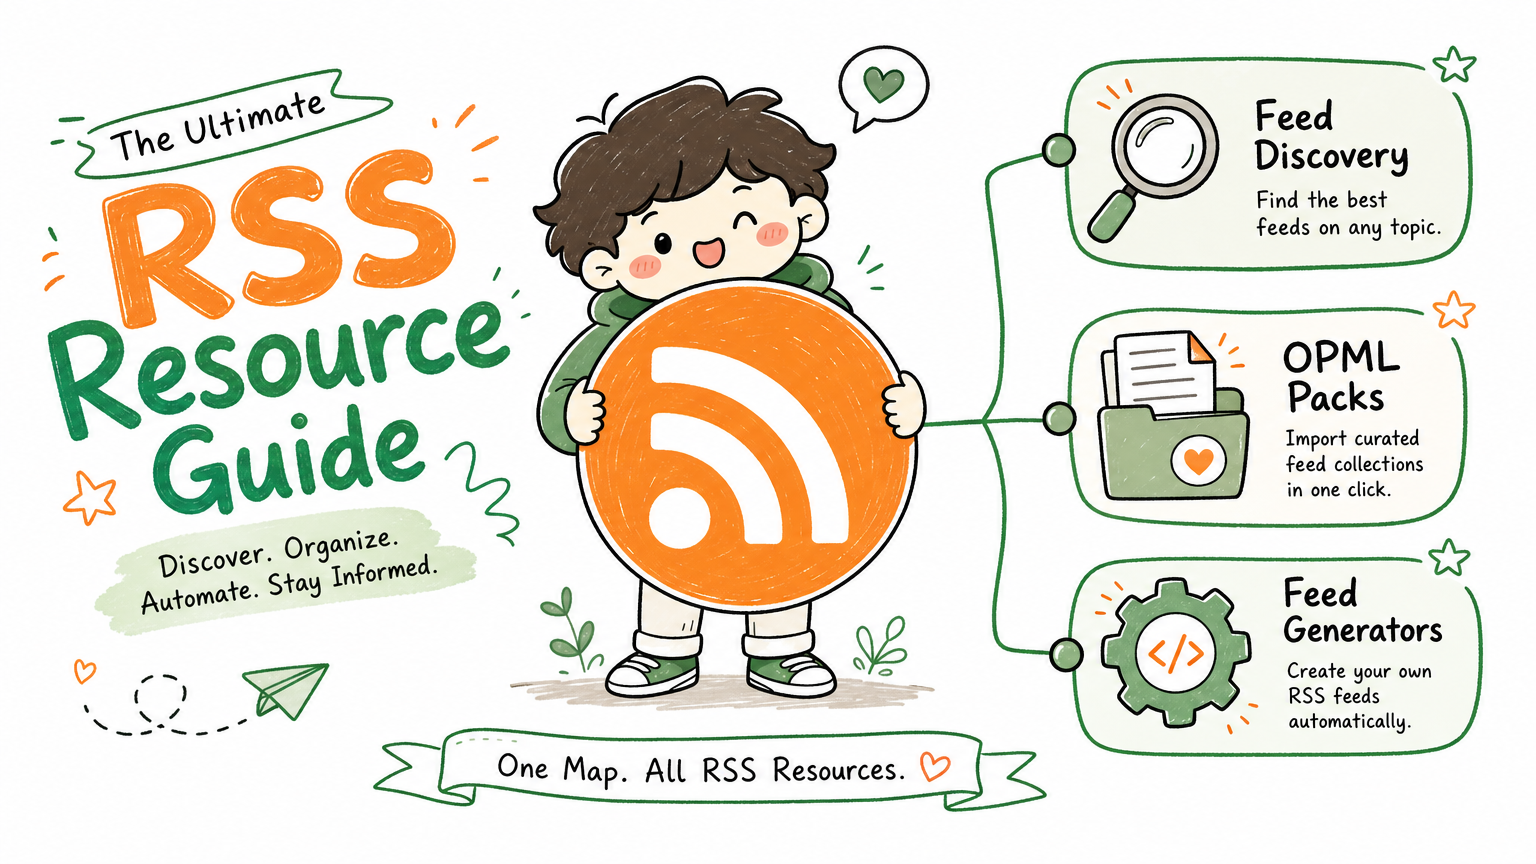
Monitoring a competitor who publishes no feed is the case every RSS guide skips. Twenty-one platforms sorted by which of three jobs they do, and the finished setup is business process automation you own outright, with no seat licence to renew.
Blaming the content is the reflex when a post underperforms, and it is usually the wrong diagnosis. A second reader decides distribution before any human sees the post, and most of what it checks is mechanical enough to automate business processes around, on five platforms at once.
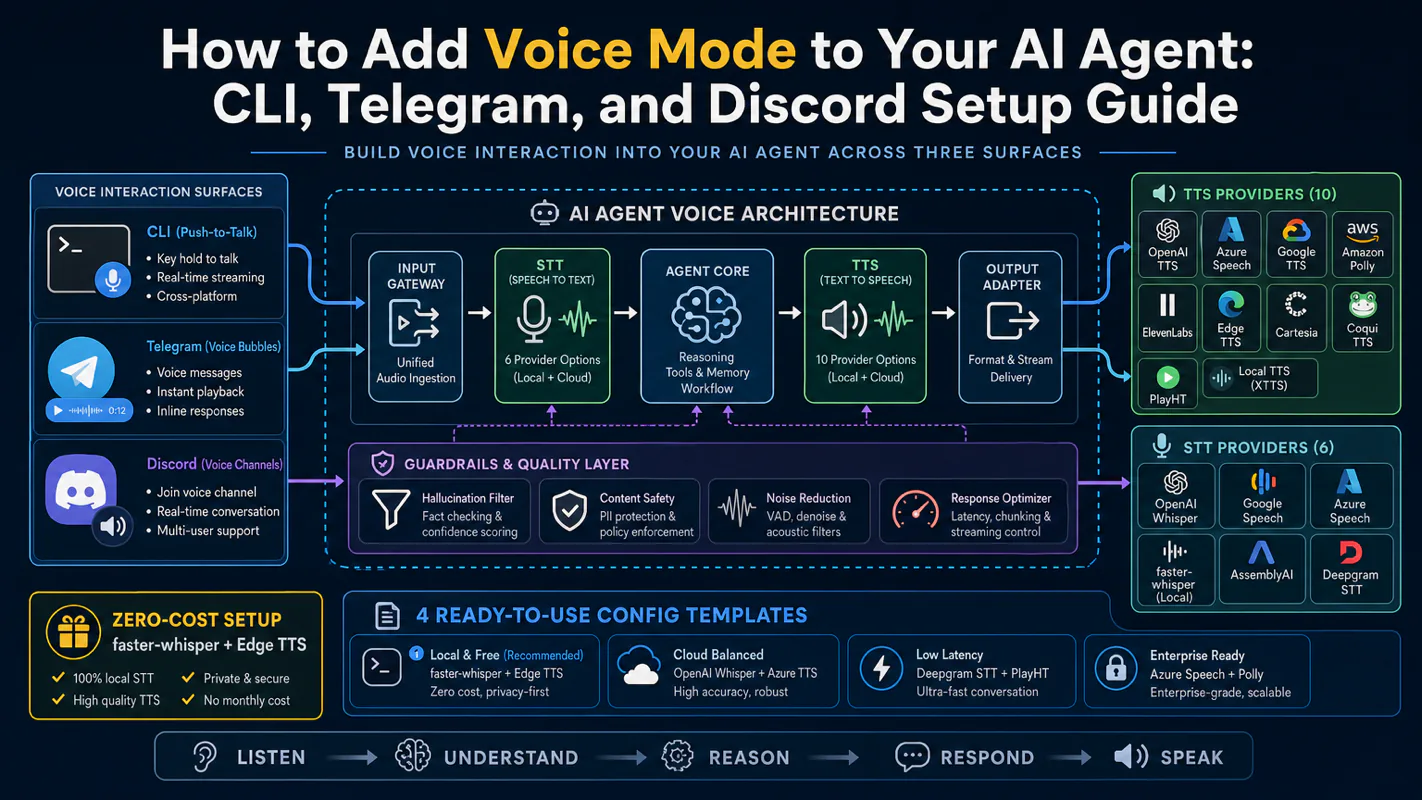
Gloves on, tape measure in hand — nobody types a query. Three voice surfaces for ai automation tools (terminal, Telegram, Discord), 10 TTS and 6 STT providers compared on cost and latency, plus a setup that costs nothing.
Claude Code CLI vs App vs IDE: Which Entry Point Should You Actually Use?
Three ways in, one engine behind them - instruction files, settings, skills and connections carry across all three. Never touched a terminal: Desktop App. Live in the shell: CLI. Live in your editor: extension. Why choosing an AI assistant for business makes this fork look bigger.
Some decisions deserve a meeting and some only look like they do. A property management office spent two weeks deciding which version to roll out to five staff, when the honest answer is that all three are the same engine behind different front doors and switching later costs nothing. Meanwhile the actual work - the lease renewal notices, the vendor invoices - waited. Evaluating an AI assistant for business throws up a lot of these false forks. This article gives the one-line rule for picking an entry point in about a minute, then explains why the choice is cheap to reverse.
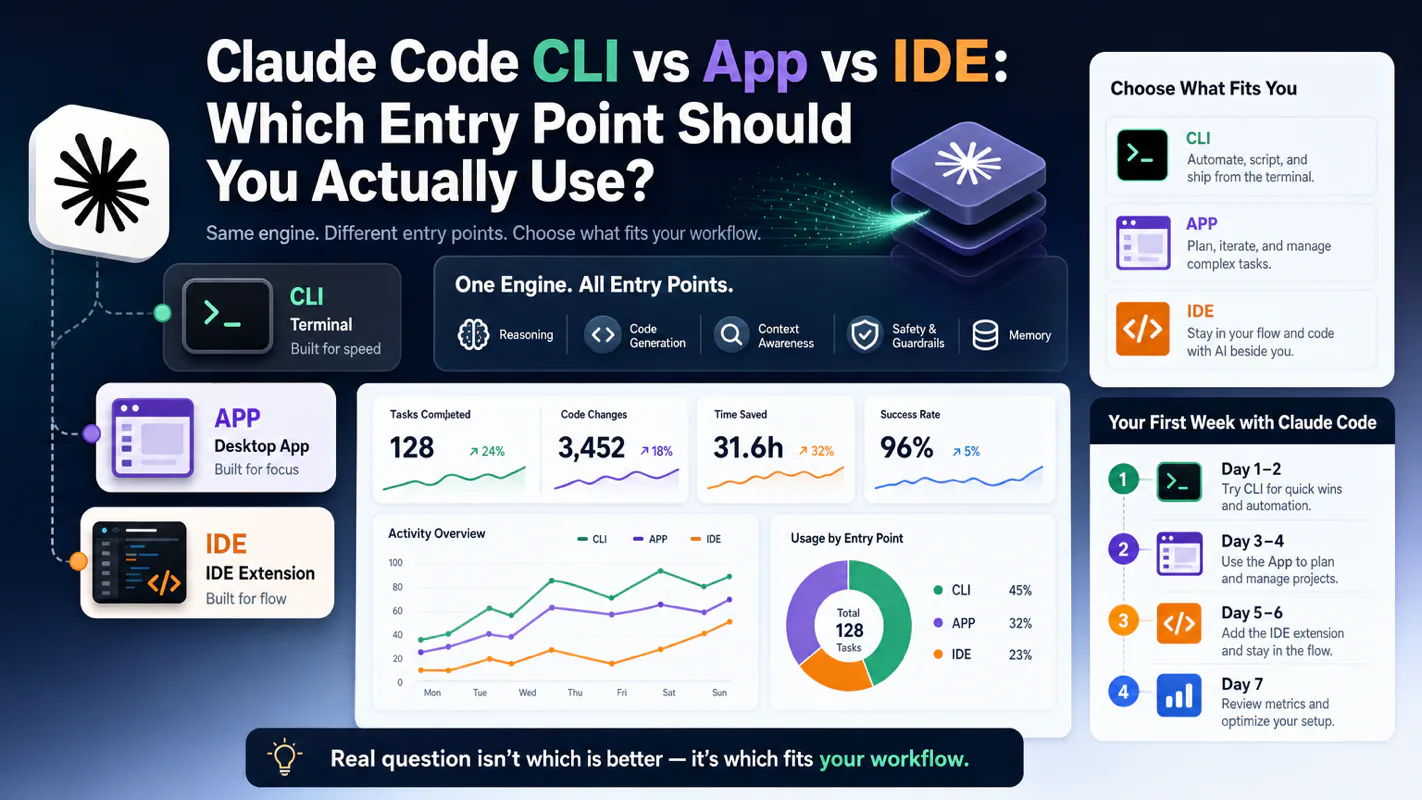
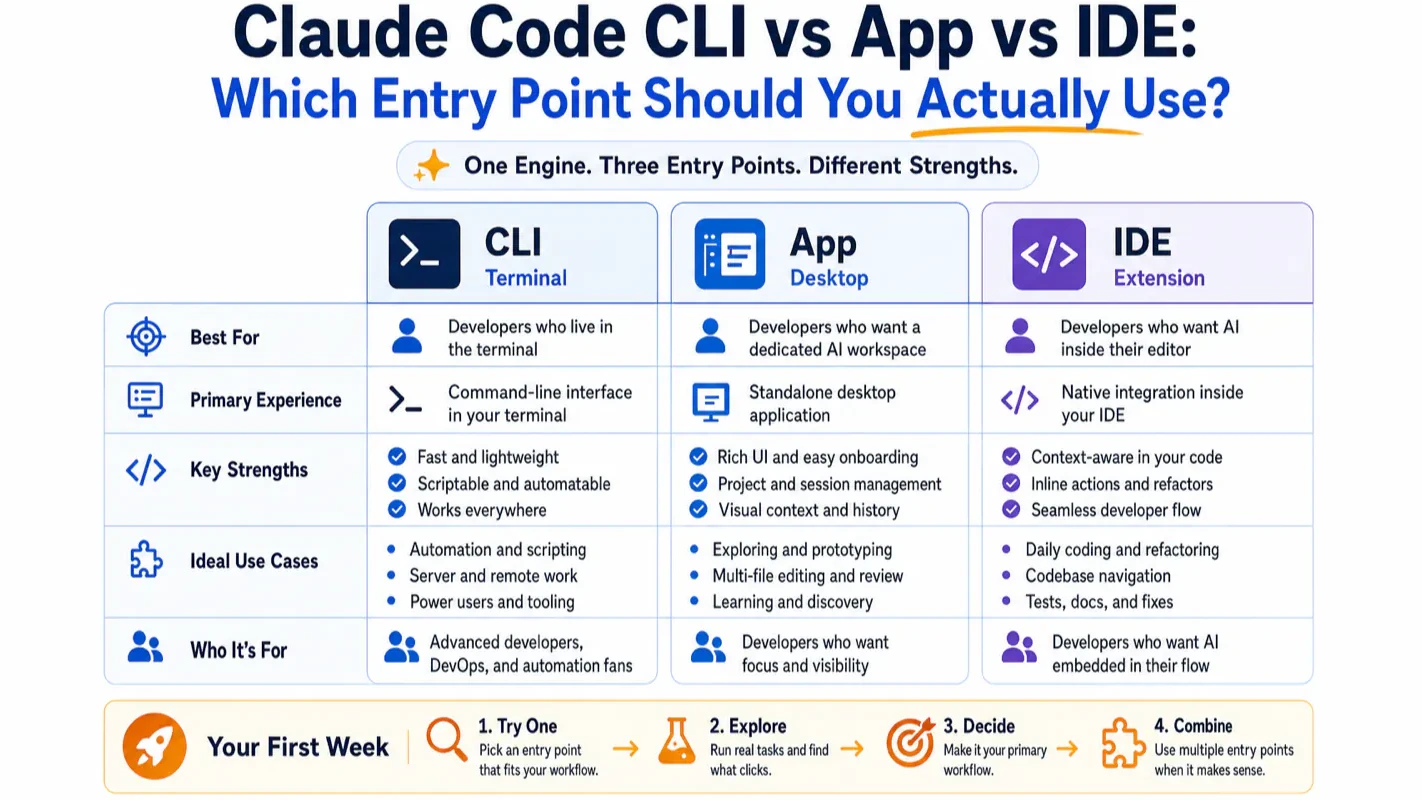
Claude Code gives you three ways in: a Terminal CLI, a Desktop App, and an IDE extension. All three connect to the same engine. Your CLAUDE.md files, settings, Skills, and MCP servers carry across every surface. The only difference is the interface — and the interface should match how you already work.
If you want the short answer: never touched a terminal, install the Desktop App. Engineer comfortable in the shell, install the CLI. Living inside VS Code or Cursor eight hours a day, install the extension. You can switch later at zero cost.
The rest of this guide explains why that shortcut works, walks through each entry point in detail, and covers the mistakes that trip up most beginners.
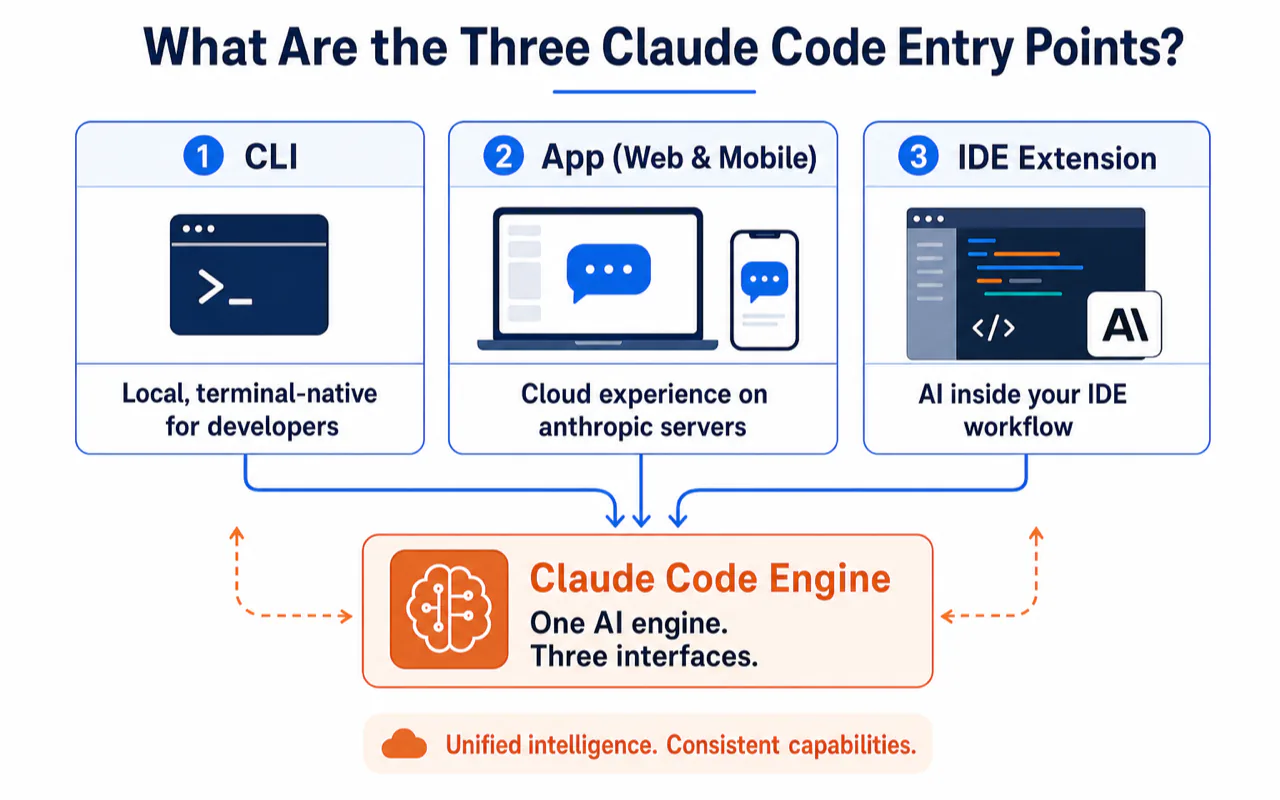
What Are the Three Claude Code Entry Points?
Claude Code is not a single application — it is a single AI engine exposed through three different interfaces. Anthropic's official overview puts it plainly: each surface connects to the same underlying Claude Code engine.
Here is the one-sentence version of each:
Entry Point
What It Is
Best For
Terminal CLI
A claude binary you run in your shell
Engineers, automation, CI/CD pipelines
Desktop App
A standalone macOS/Windows application with a graphical interface
Beginners, product managers, content creators
IDE Extension
A panel inside VS Code, Cursor, or JetBrains
Developers who never want to leave their editor
The web version at claude.ai/code and the mobile app are cloud extensions of the Desktop App — tasks run on Anthropic's servers and keep going after you close your laptop. Useful later, not where you should start.
Why Does Claude Code Have Multiple Entry Points?
People who write code work in fundamentally different environments. A DevOps engineer lives in the terminal. A solo founder building their first product wants buttons and visual diffs. A frontend developer has VS Code open from morning to night.
Forcing everyone through one interface would make the tool worse for most people. Multiple entry points are not a complexity problem — they are a fit problem solved.
The key insight: choosing an entry point is not choosing a capability tier. You are choosing a workspace that matches your existing habits.
How Does the Shared Engine Work in Practice?
This is the single most important fact for anyone comparing entry points. When Anthropic says "shared engine," they mean these items are literally the same files read by every surface:
Configure once. Write a CLAUDE.md in your CLI session and it takes effect in the Desktop App and IDE extension immediately.
Switch at zero cost. Run /desktop in CLI to hand a session to the Desktop App. Use claude --teleport to pull a cloud session back to your terminal. Run claude --resume in VS Code to pick up a CLI conversation.
Do not install all three. Most capabilities overlap. Installing everything gives you three dashboards showing the same data — pure overhead for a beginner.
I run Claude Code across four Macs daily. The shared engine means I configured my workflow once and it works everywhere. When I switched from primarily using CLI to adding the Desktop App for visual diffs, every project memory file and MCP connection carried over without touching a single config.
Which Entry Point Should You Pick?
Match yourself to one of three profiles. Pick the first one that fits.
Are You New to the Terminal?
Install the Desktop App. Skip everything else.
The Desktop App was designed for people who have never opened a terminal. Anthropic's own installation docs lead with this: "Prefer a graphical interface? The Desktop app lets you use Claude Code without the terminal."
What you get:
Double-click installer, no runtime setup
Visual diff panel showing every change Claude proposes
Default "ask before every change" mode — nothing lands until you approve
Multi-session sidebar for running parallel tasks
Your first move: download the Desktop App, sign in with a paid subscription, click the Code tab (not Chat, not Cowork), select a familiar project folder, and ask Claude to explain the project structure. That is it. You will see how it reads files and proposes changes before you give it anything risky.
The Desktop App has three tabs that confuse beginners. Chat is a plain conversation — it never touches your files. Cowork runs a cloud agent that works autonomously. Code is the programming assistant that reads and modifies your local files with your approval. This guide is about the Code tab.
Are You an Engineer Comfortable in the Shell?
Install the CLI.
One-line installation, cross-platform:
# macOS / Linux / WSL (recommended)
curl -fsSL https://claude.ai/install.sh | bash

# macOS via Homebrew
brew install --cask claude-code

# Windows PowerShell
irm https://claude.ai/install.ps1 | iex

# Verify
claude --version
Linux users also have signed apt/dnf/apk repositories available.
What you get:
Feature-complete surface — new capabilities land here first
Native automation: claude -p "analyze this log" runs headless, exits when done
Pipe input directly: git diff main | claude -p "review these changes for security issues"
Full slash command set and tab completion
The CLI's default mode asks for approval on every action. Keep it that way for at least two weeks. I have seen engineers disable the safety net on day one, then spend an afternoon reverting changes they did not understand. The approval flow is slow but educational — you learn exactly what Claude reads, what it proposes, and when it executes commands.
# Practical CLI automation examples
# Feed logs and get analysis
tail -200 app.log | claude -p "flag any anomalies and suggest fixes"

# Batch review changed files
git diff main --name-only | claude -p "check these files for security issues"

# Non-interactive one-shot task
claude -p "translate all new copy to French and open a PR"
These headless patterns — run, process, exit — are the CLI's home turf. The Desktop App and IDE extension cannot replicate this cleanly.
Do You Live Inside Your Editor?
Install the IDE extension.
VS Code / Cursor / Windsurf / Kiro: open the extension marketplace (Cmd+Shift+X), search "Claude Code," click install.
JetBrains (IntelliJ / PyCharm / WebStorm): install from the JetBrains plugin marketplace, restart the IDE.
What you get:
Zero context switching — Claude Code lives in a panel beside your code
@filename references pull files into context instantly
Selected code is automatically visible to Claude
Plan mode, inline diffs, checkpoint-based rollback (VS Code)
A fact that saves many beginners a false choice: the VS Code extension installs directly into Cursor. You can run Cursor's real-time autocomplete for line-level suggestions and delegate multi-file refactoring to Claude Code — two AI systems, each handling what it does best, in one window. I have used this combination for months and the two never conflict.
JetBrains support includes diff viewing and selection context sharing. The graphical feature set is slightly smaller than VS Code's, but the shared settings.json means your configuration is identical.
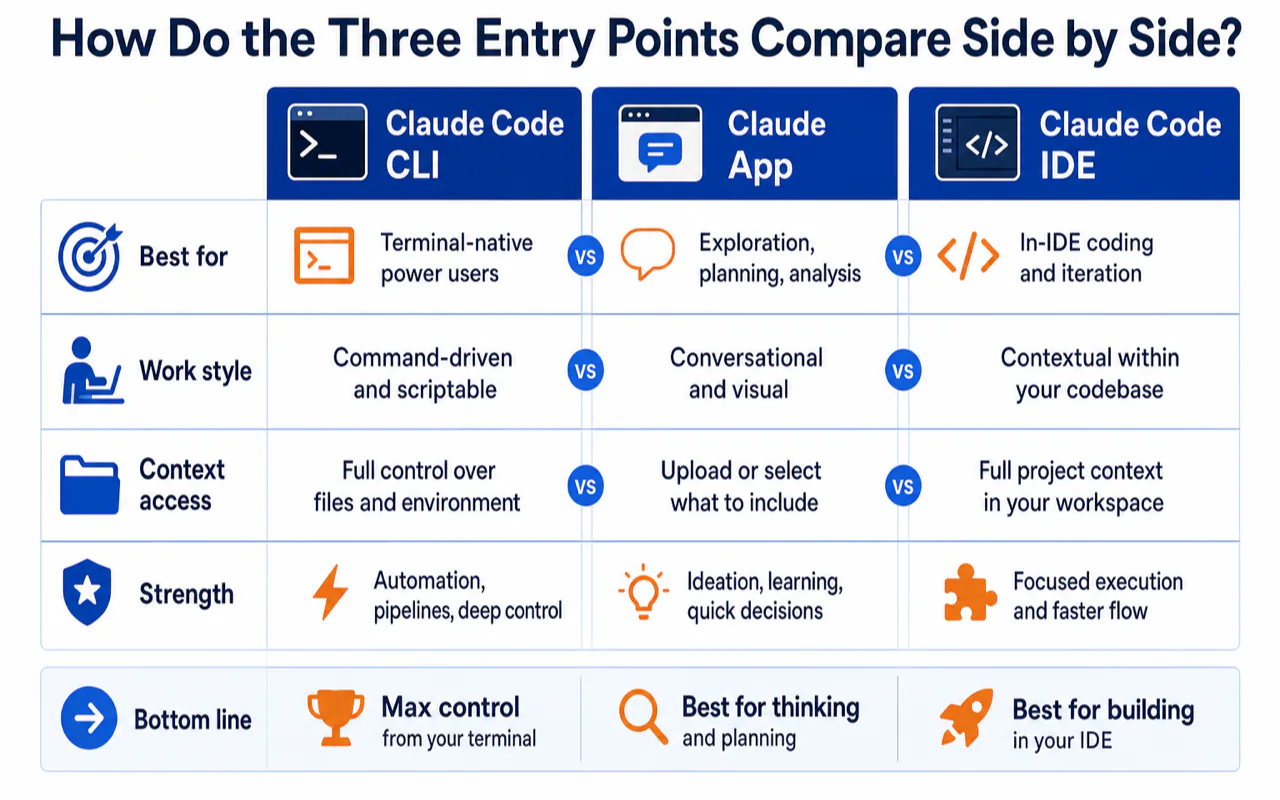
How Do the Three Entry Points Compare Side by Side?
This table covers only differences you can feel — not spec sheets.
What You Notice
CLI
Desktop App
IDE Extension
Requires terminal knowledge
Yes
No
No
Visual diff panel
Text-based
Graphical side-by-side
Inline diffs
Plan mode (review before execution)
Yes
Yes
Yes
Parallel sessions
Manual (multiple terminals)
Sidebar management
Multiple tabs
Automation / scripting
Strongest
Partial
Weak
Stay inside your editor
No
No
Yes
New features arrive first
Yes
Follows
Subset
Live preview of running code
No
Yes
No
Read the row you care about most. The column where it lands is your entry point.
What Should Your First Week Look Like?
Regardless of which entry point you chose, the first-week goal is the same: understand how Claude Code reads files, proposes changes, and executes commands.
Three Habits to Build Immediately
Commit before every task. Claude modifies your files. Without a git checkpoint, rollback means manual reconstruction. Run git commit -m "pre-claude checkpoint" before every new task. This is the cheapest safety net available.
Use Plan Mode for anything non-trivial. Plan Mode makes Claude propose a plan before touching any file. You review, annotate, approve, or reject. Anthropic lists this as the single most important habit for new users.
Keep the default approval mode. Every entry point defaults to asking before each action. Resist the urge to turn it off. Two weeks of watching Claude's proposals will teach you its behavior patterns better than any documentation.
Desktop App First Week
Choose Local environment (not Remote, not SSH) — you want to see changes on your own filesystem
Start with read-only tasks: "Explain this project's structure," "List all TODO comments," "Summarize what this module does"
Graduate to low-risk writes: "Fix this typo in the README," "Add JSDoc comments to this function"
CLI First Week
Run pwd before every claude session — most CLI accidents happen because the user started in the wrong directory
Start with claude (interactive mode) before trying claude -p (headless mode)
Use claude --resume to continue previous conversations instead of restarting context
IDE Extension First Week
Practice @filename references — type @auth and watch it resolve to AuthService.ts
Learn when to ask about the current file vs. when to ask about the whole project
Use the built-in terminal (Ctrl+\``) to run claude` directly — the extension and CLI share session history
When Should You Add a Second Entry Point?
Start with one. Add a second only when you hit a specific limitation.
What You Feel After Two Weeks
Add This
"I want to see every change visually and run parallel tasks"
Desktop App
"I want to automate recurring tasks or batch-process files"
CLI
"I hate switching windows while editing code"
IDE Extension
Every additional entry point should have one clear default purpose. Avoid the trap of opening all three and deciding per-task where to start — that burns more time than it saves.
My stable setup after months of daily use: CLI as the automation engine, Desktop App as the visual review station, and Claude Code extension inside Cursor for editor-native work. But I arrived at that combination by starting with CLI alone and adding surfaces only when I hit real friction. The combination is a result, not a starting point.
What Are the Most Common Beginner Mistakes?
Five patterns I see repeatedly:
Mistake 1: Installing All Three on Day One
The shared engine means you get the same AI from every surface. Installing all three gives you three views of the same thing. Start with one. Add others when you have a reason.
Mistake 2: Agonizing Over Which Is "Better"
The Desktop App is not a dumbed-down CLI. The CLI is not an advanced Desktop App. They are different interfaces to identical capabilities. Pick the one that matches your current habits and start building.
Mistake 3: Confusing the Desktop App's Code Tab with Chat
The Desktop App has three tabs: Chat (plain conversation, never touches files), Cowork (autonomous cloud agent), and Code (programming assistant that modifies your local files). If Claude is not reading your project, you are probably in the Chat tab.
Mistake 4: Disabling Approval Mode in Week One
The default "ask before every action" mode feels slow. That slowness is the feature — it forces you to read what Claude proposes before it executes. Keep it on for at least two weeks. You will learn Claude's behavior patterns faster than through any other method.
Mistake 5: Fearing That Switching Entry Points Loses Your Work
CLAUDE.md, settings, Skills, MCP configurations, and session history all persist across entry points. A CLI session can be resumed in the Desktop App. A VS Code conversation can be continued in the terminal. Switching is free. Start anywhere, migrate anytime.
Ready-to-Use Prompt: Pick Your Claude Code Entry Point and Map Your First Week
What this does: Scores the three Claude Code entry points (CLI, Desktop App, IDE extension) against how you already work, picks the single best one to start, maps your first week, and tells you the exact signal that justifies adding a second. Based on: Claude Code CLI vs App vs IDE: Which Entry Point Should You Actually Use? — https://aiworkflowpro.com/claude-code-cli-app-ide-guide/ Time to run: ~3 minutes
Copy this prompt into Claude Code, ChatGPT, or any AI assistant:
ROLE: You are a Claude Code onboarding advisor. Your job: pick the single entry point (CLI, App, or IDE) that matches how a person already works, and tell them exactly when to add a second.

CONTEXT — ENTRY POINT SELECTOR:
Claude Code has three entry points — Terminal CLI, Desktop App, IDE extension — all running the same engine, so your CLAUDE.md, settings, Skills, and MCP servers carry across every surface. The only real difference is the interface, and the right choice is the one that matches how you already work: shell-comfortable engineers → CLI; people who never touch a terminal → Desktop App; developers living inside VS Code or Cursor → the IDE extension. You can switch later at zero cost, so the goal is the lowest-friction first pick, not a permanent commitment.

INPUTS (fill in before running):
- WORK_STYLE: YOUR_DAILY_FLOW_HERE (where you spend your day — terminal, editor, browser, mix)
- TERMINAL_COMFORT: YOUR_LEVEL_HERE (none / can run a few commands / fluent)
- PRIMARY_EDITOR: YOUR_EDITOR_HERE (VS Code / Cursor / JetBrains / none / other)
- NEEDS_AUTOMATION: YOUR_ANSWER_HERE (do you want to script or schedule runs? yes/no)

METHOD — 6 STEPS:

Step 1 — Score the CLI
Rate the Terminal CLI 0-5 on fit using: terminal comfort (fluent = high), need for automation/scripting (yes = high), and primary workspace (lives in terminal = high). State the score per dimension.

Step 2 — Score the Desktop App
Rate the Desktop App 0-5 on fit using: terminal comfort (none = high fit), onboarding ease (beginner = high), and workspace (non-editor = high). State the score per dimension.

Step 3 — Score the IDE extension
Rate the IDE extension 0-5 on fit using: PRIMARY_EDITOR match (VS Code/Cursor = high), edit-review style (inline diffs = high), and time-in-editor (8h/day = high). State the score per dimension.

Step 4 — Pick one entry point
Sum the dimension scores; pick the single highest. Tie-break by lowest onboarding friction. State the pick and a one-line reason. Because the engine is shared, no capability is lost in the first pick.

Step 5 — Map the first week
For the chosen entry point, give a day-by-day first-week plan: install → connect CLAUDE.md/settings → first real task → add one MCP or Skill. Each day has one concrete action, not a tour.

Step 6 — Set the trigger to add a second entry point
Name the specific signal that justifies a second entry point (e.g., "you now script runs the GUI can't do" → add CLI to App; "you edit inside the editor more than the terminal" → add IDE). Until that signal fires, do not add a second — one surface first.

RULES:
- Pick exactly one entry point to start — never install all three on day one.
- The engine is shared; the choice is interface, not capability — do not optimize for "most powerful."
- Score against how the person already works, not against best-practice ideals.
- Add a second entry point only when a concrete trigger fires, not on curiosity.

OUTPUT FORMAT:
Output five sections:
1. **CLI score** — fit per dimension + total (0-5 scale).
2. **Desktop App score** — fit per dimension + total.
3. **IDE extension score** — fit per dimension + total.
4. **Pick + first week** — the chosen entry point + one-line reason, then a markdown table with columns: Day | Action.
5. **Second-entry-point trigger** — the specific signal that would justify adding a second surface.
Save as @templates/claude-code-cli-app-ide-guide.md and run when you first install Claude Code, then re-run only if your work style changes or a second-entry-point trigger fires.
FAQ
Does Claude Code CLI have more features than the Desktop App?
Yes, but the gap keeps narrowing. CLI gets new features first — headless mode, pipe input, and full slash commands arrived there before other surfaces. The Desktop App counters with visual diff panels, multi-session management, and live preview. Core AI capabilities are identical because both connect to the same engine.
Can I use Claude Code in Cursor alongside Cursor's own AI?
Yes. The VS Code extension installs directly into Cursor (and Windsurf, and Kiro — all VS Code forks). Run Cursor's autocomplete for line-level suggestions and delegate multi-file tasks to Claude Code. The two systems do not conflict.
Do settings and sessions sync across entry points?
Yes. Anthropic states that sessions are not tied to a single surface. CLAUDE.md, settings.json, Skills, and MCP server configs are shared. Use /desktop to hand a CLI session to the Desktop App, claude --teleport to pull a cloud session to your terminal, or claude --resume to continue any conversation.
Is Claude Code free?
No. It requires Pro, Max, Team, or Enterprise subscription — or access through Anthropic Console, Amazon Bedrock, or Google Vertex AI. Check Anthropic's pricing page for current rates.
Does Claude Code work on Windows?
Yes. CLI runs natively on Windows (PowerShell, CMD, WinGet) and inside WSL 2. The Desktop App ships x64 and ARM64 installers. The VS Code extension works identically on Windows and macOS.
One-Line Takeaway
Claude Code's three entry points are three faces of one engine — install the one that matches how you already work, run it for two weeks, then decide if you need another.
Monitoring a competitor who publishes no feed is the case every RSS guide skips. Twenty-one platforms sorted by which of three jobs they do, and the finished setup is business process automation you own outright, with no seat licence to renew.
Blaming the content is the reflex when a post underperforms, and it is usually the wrong diagnosis. A second reader decides distribution before any human sees the post, and most of what it checks is mechanical enough to automate business processes around, on five platforms at once.
Gloves on, tape measure in hand — nobody types a query. Three voice surfaces for ai automation tools (terminal, Telegram, Discord), 10 TTS and 6 STT providers compared on cost and latency, plus a setup that costs nothing.
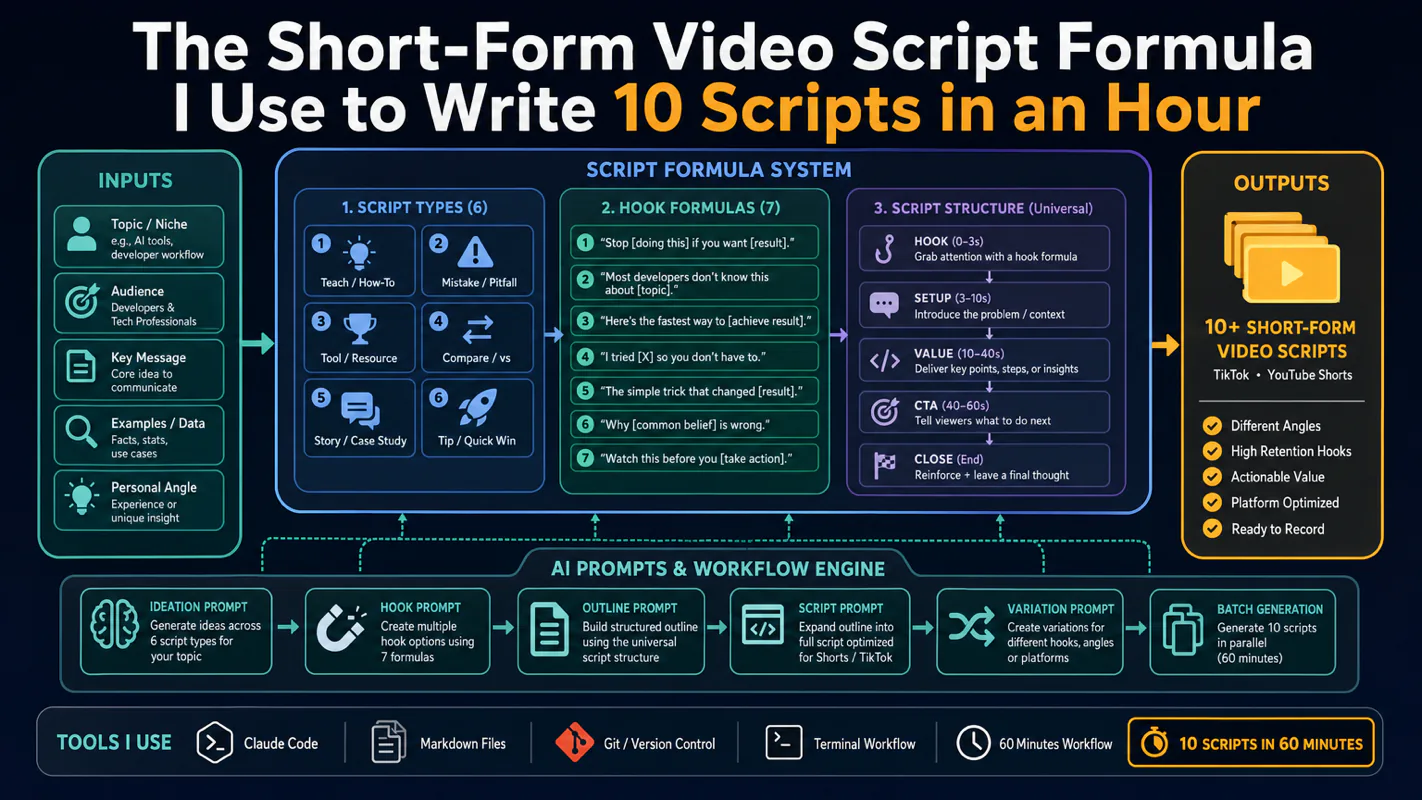
Thursday afternoon, fourteen product ideas, a Monday filming slot, no scripts. Six script shapes and seven hook formulas turn that hour into finished drafts — and the business rule stays: rewrite at least 30% before anything ships.