Monitoring a competitor who publishes no feed is the case every RSS guide skips. Twenty-one platforms sorted by which of three jobs they do, and the finished setup is business process automation you own outright, with no seat licence to renew.
Blaming the content is the reflex when a post underperforms, and it is usually the wrong diagnosis. A second reader decides distribution before any human sees the post, and most of what it checks is mechanical enough to automate business processes around, on five platforms at once.
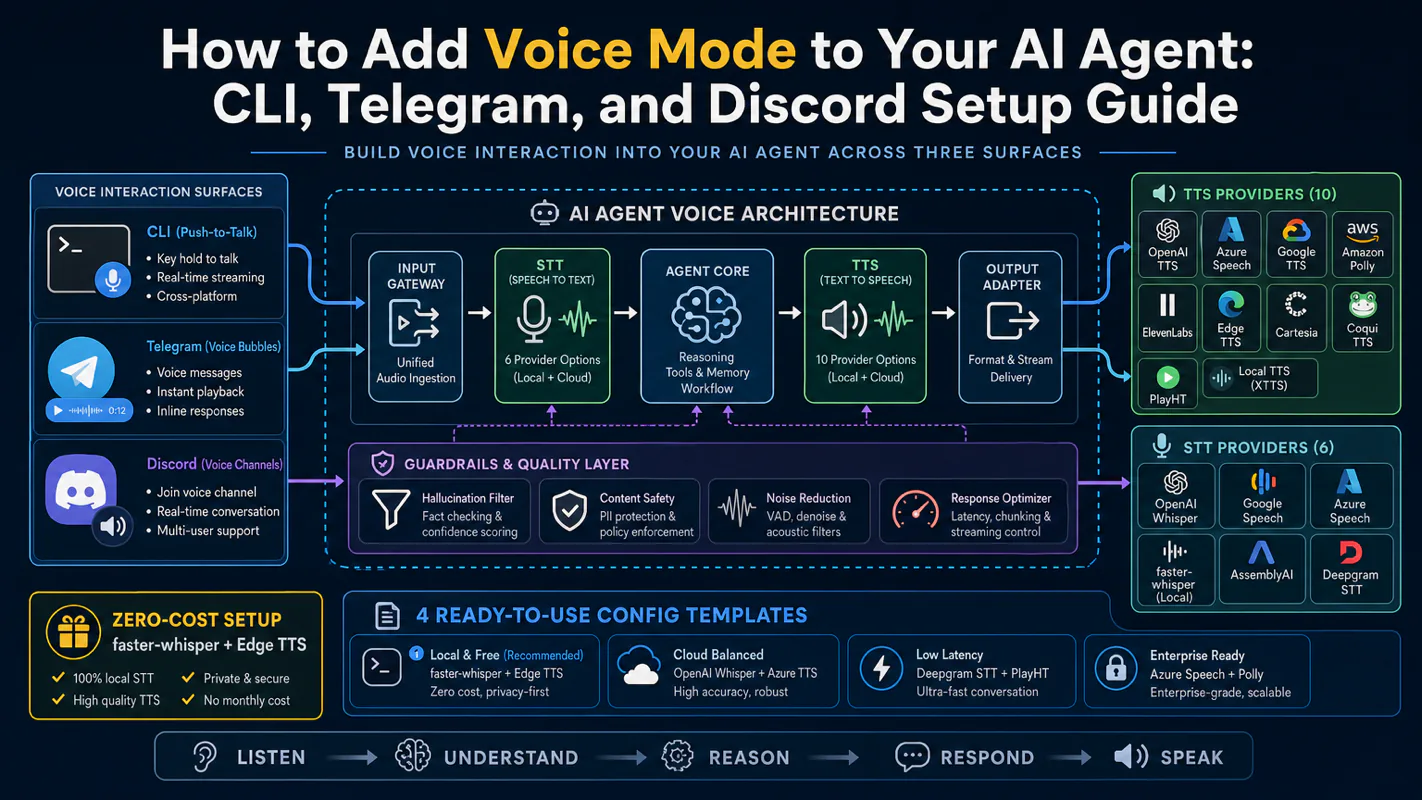
Gloves on, tape measure in hand — nobody types a query. Three voice surfaces for ai automation tools (terminal, Telegram, Discord), 10 TTS and 6 STT providers compared on cost and latency, plus a setup that costs nothing.
How to Control Grok Bot from the Terminal — A Complete Guide
Grok Bot has no official API. But its cloud VM runs an internal HTTP gateway on port 1340. Here is how to reach it from your terminal using Tailscale, send commands to your bots, and wrap the whole thing in shell functions.
Grok Bot launched on August 11, 2026. Within the first week, the question showed up in the Cursor forums: can I send it a message from outside the app?
The short answer is yes. The longer answer involves a cloud VM, an undocumented HTTP gateway, and a WireGuard tunnel. I got it working today, and here is every step — from zero to sending commands from your terminal.
The Problem
Grok Bot runs your AI agents on a cloud VM managed by xAI. Each bot gets its own workspace with a full Linux environment, file access, and tool use. You interact with those agents through the Grok Bot desktop app — click a bot, type a message, watch it work.
That is fine for one-off tasks. But the moment you want to do anything programmatic, you hit a wall:
No API — there is no public HTTP endpoint you can call
No CLI — no command-line tool ships with the app
No webhooks — nothing that lets an external event trigger a bot
No inter-agent messaging — Claude Code cannot talk to a Grok Bot agent directly
The desktop app is the only interface. You have to be sitting in front of it, clicking and typing.
For anyone running AI agents as part of a larger system — cron jobs, multi-agent pipelines, automated workflows — this is a dead end. You cannot automate what you cannot reach.
What I Found
Digging into the Grok Bot app, I discovered that the cloud VM runs an internal HTTP gateway. It listens on port 1340, accepts JSON POST requests, and authenticates with a Bearer token stored on the VM itself.
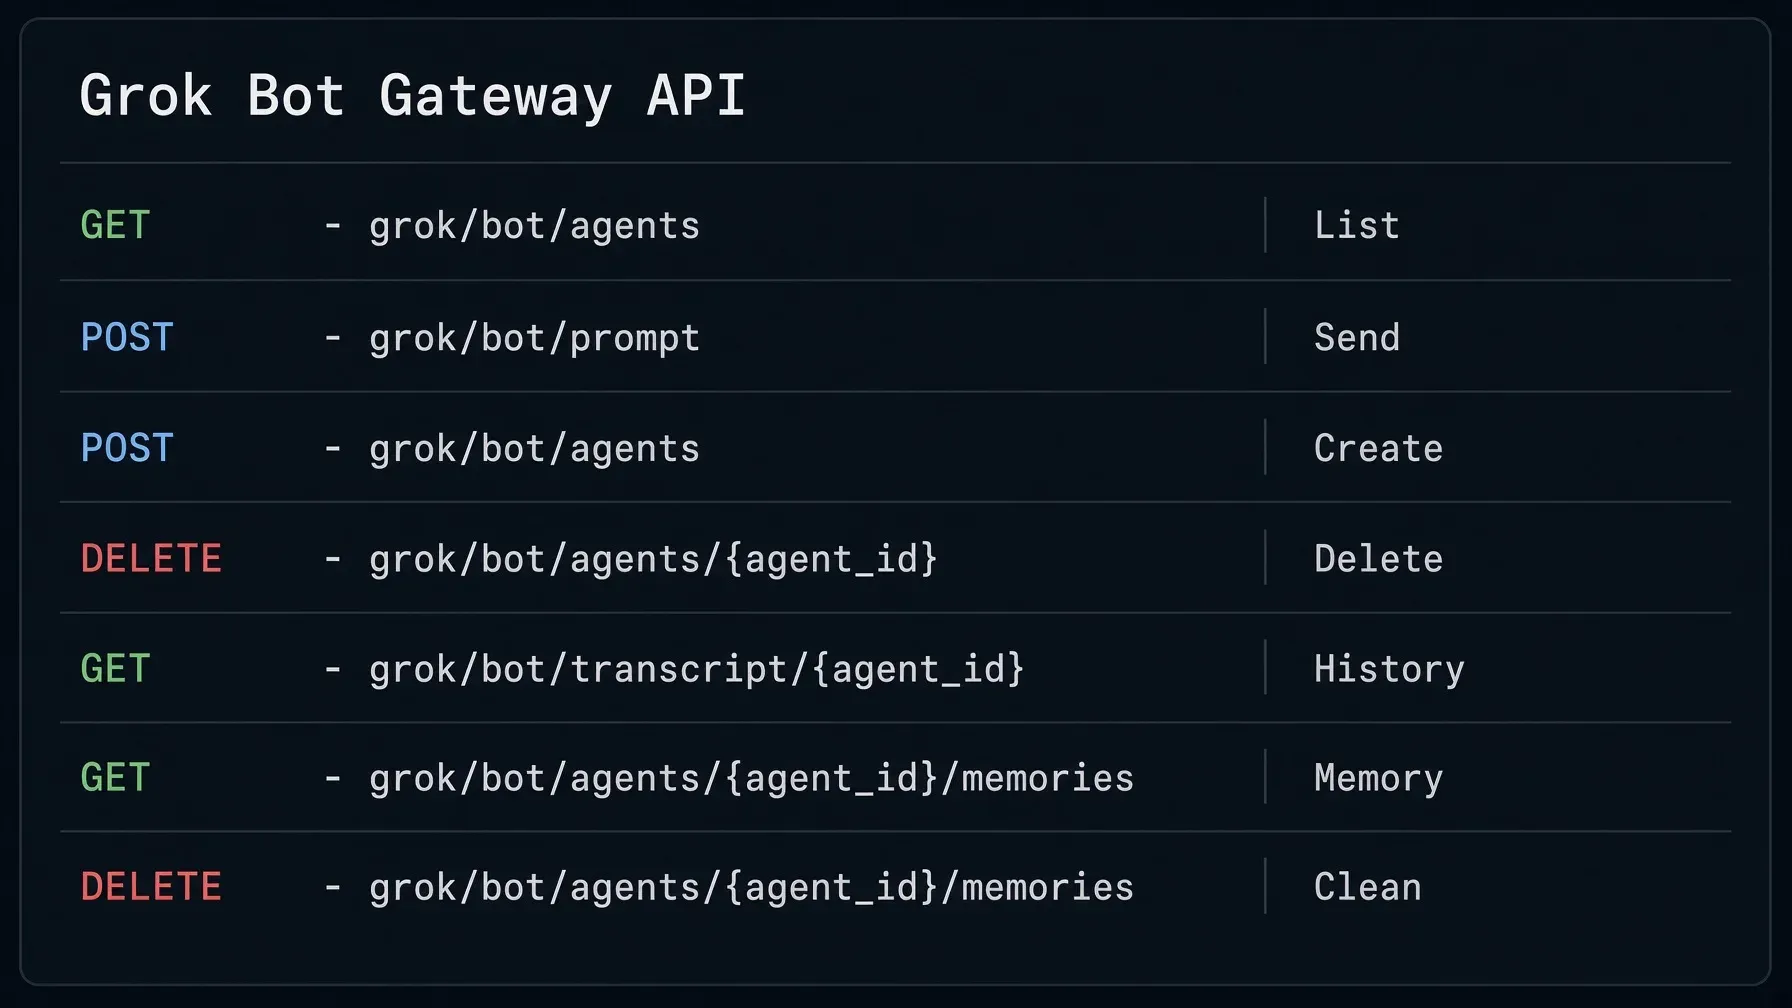
The gateway is not documented anywhere. It is not meant for external use. But it exposes a surprisingly complete set of operations:
List all bots and their status
Send messages to running bots
Create and delete bots
Read full conversation transcripts
Read, add, and delete bot memories
The problem is that port 1340 is only accessible from inside the VM. From the public internet, it is unreachable. The VM has no open ports, no SSH access, and no way to forward traffic out.
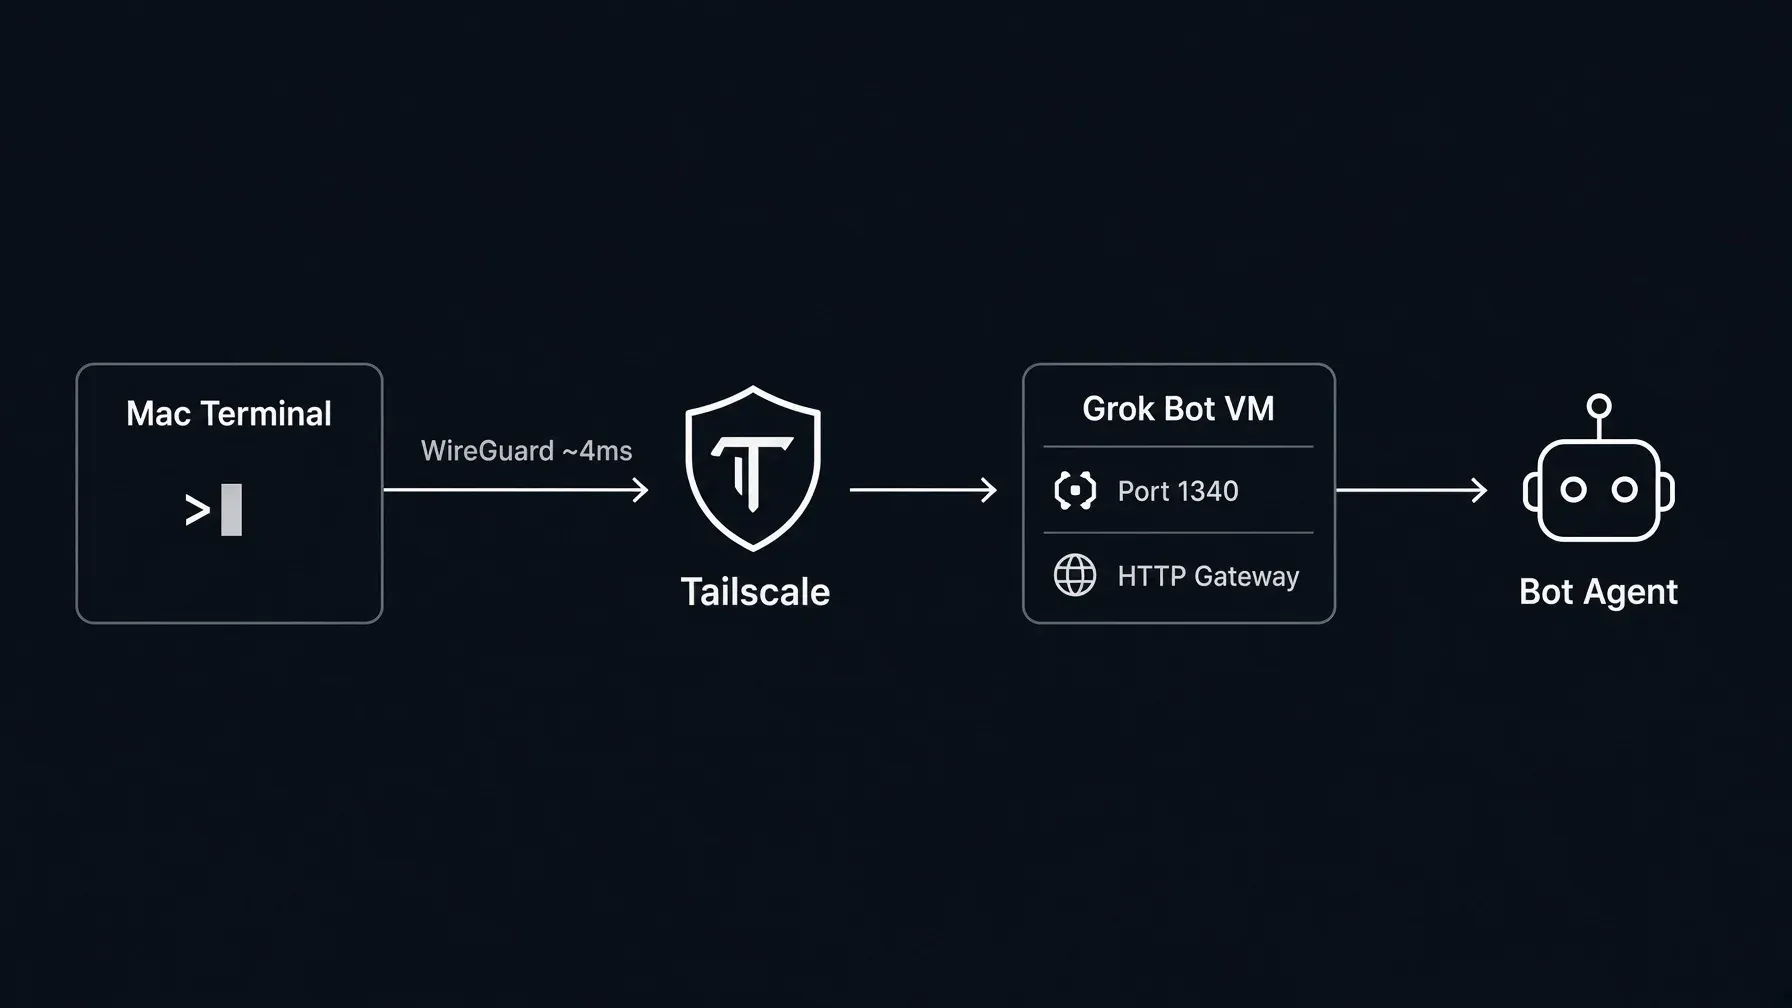
The solution turned out to be Tailscale. Install Tailscale on the VM, install it on your Mac, and both machines join the same private mesh network over WireGuard. Suddenly your terminal can reach 100.x.x.x:1340 as if the VM were sitting next to you on the LAN.
The total setup takes about 10 minutes. The latency is around 4 milliseconds.
Architecture
Here is how the pieces fit together:
Mac terminal (curl / scripts / Claude Code)
  → Tailscale (WireGuard encrypted, ~4ms)
  → Grok Bot cloud VM (100.x.y.z:1340)
  → Internal HTTP gateway (Bearer token auth)
  → Bot receives message and executes
Key properties of this setup:
Encrypted end-to-end — all traffic travels inside a WireGuard tunnel. Nothing goes over the public internet unencrypted.
No open ports — neither machine exposes ports to the internet. Tailscale handles NAT traversal automatically.
Minimal attack surface — the only reachable service is port 1340 on the VM, and only from devices in your tailnet.
Prerequisites
Before you start, make sure you have:
Grok Bot desktop app — installed, logged in, and at least one bot created. You need a SuperGrok Heavy, Cursor Ultra, or Cursor Teams Premium subscription.
Tailscale — the free client from tailscale.com/download. Works on Mac, Windows, and Linux.
A Tailscale account — the free personal plan at tailscale.com is enough. It supports up to 100 devices.
Reusable: Yes — this lets the VM reconnect to your tailnet after restarts without generating a new key each time
Ephemeral: Yes — the VM appears as an ephemeral node, which means it automatically disappears from your device list when disconnected. This keeps your tailnet clean since the VM gets rebuilt periodically.
Expiry: 90 days — the maximum. Set a calendar reminder to rotate it.
Click Generate key. You get a string that looks like tskey-auth-kBPxxxxxxCNTRL-xxxxxxxxx. Copy it and store it securely — you will need it in two places (your Mac config and the VM terminal).
One key serves both machines because the auth key registers devices into your tailnet. Your Mac and the VM each use the same key to join the same network.
Open the Tailscale app, sign in, and your Mac joins your tailnet. Alternatively, use the CLI:
tailscale up --auth-key=tskey-auth-YOUR_KEY_HERE
Check that Tailscale is connected:
tailscale status
You should see your Mac listed with a 100.x.x.x IP. The VM will appear here too after Step 3.
Step 3: Install Tailscale on the Grok Bot VM
Open the Grok Bot desktop app. Click My Computer to open the VM environment. Find and open the terminal.
This step must be done from the "My Computer" terminal, not from a bot. Bots run in a sandboxed environment that may not have the permissions needed for Tailscale.
3.1 Install Tailscale
curl -fsSL https://tailscale.com/install.sh | sh
This downloads and installs the Tailscale daemon and CLI. It takes about 15 seconds on the VM.
3.2 Start the Tailscale Daemon
sudo tailscaled &
The & runs it in the background. Wait about 3 seconds for the daemon to initialize. You will see some log output — that is normal.
3.3 Join Your Tailnet
sudo tailscale up --auth-key=tskey-auth-YOUR_KEY_HERE --hostname=grokbot-vm
The --hostname flag gives the VM a recognizable name in your Tailscale admin panel. Without it, the hostname would be whatever the VM's default is (usually something generic).
When it connects, you see output that includes Switching ipn state Starting -> Running. That confirms the VM has joined your tailnet.
3.4 Get the VM's Tailscale IP
tailscale ip -4
This prints a single 100.x.x.x address. In my setup it was 100.x.y.z. Write this down — it is the address your Mac will use to reach the VM.
The IP is stable across reconnections as long as the hostname stays the same. If the VM gets a new hostname (after a full rebuild), Tailscale may assign a different IP.
3.5 Get the Gateway Token
The HTTP gateway writes its configuration to a JSON file on the VM:
If everything is connected, you get back a JSON array with each bot's id, name, and isRunning status. If the command hangs or returns an error, check the troubleshooting section.
To send a message, open a bot's conversation in the app first (so it becomes isRunning: true), then use sendPrompt with the bot's UUID. See the API Reference section below for the full request format and all available endpoints.
API Reference
All endpoints use the POST method. Every request needs the Authorization: Bearer <token> header and Content-Type: application/json.
Returns an array of bot objects. Useful fields: id (UUID, needed for all other calls), name, isRunning (must be true for sendPrompt), description, lastEntry.
Returns the full conversation history as a JSON array. Each entry includes the role (user/assistant/tool), content, and timestamp. Tool calls and their results are included, which makes this useful for auditing what a bot actually did.
Returns an array of memory entries. Each has an id, content (the memory text), and kind (the memory category). Grok Bot uses memories to persist information across conversations.
Removes one memory entry and returns the remaining memories. Useful for cleaning up outdated or incorrect memories without wiping everything.
Other Endpoints
Two more endpoints exist in the gateway but I have not fully tested them:
/api/duplicateAgent — appears to clone a bot
/api/updateAgent — appears to modify bot properties (name, description)
/api/clearAgentMemories — appears to wipe all memories for a bot
I will update this section as I test them.
How the Internal Gateway Works
Before building on top of these endpoints, it helps to understand what is actually running on the VM.
When the Grok Bot app launches a cloud VM, it starts several processes. One of them is an HTTP server that binds to 0.0.0.0:1340. This server acts as a bridge between HTTP clients and the bot runtime. It is how the desktop app itself communicates with the bots — the app's UI makes HTTP calls to this gateway on localhost.
The gateway generates a random Bearer token on startup and writes it to /home/box/sand-data/gateway.json alongside the port number and process ID. The desktop app reads this file to authenticate its own requests. When you make a curl call with the same token, the gateway cannot distinguish you from the app.
This is why sendPrompt requires the bot to be running — the gateway passes your message to an active bot process. If the bot is not loaded (conversation window closed), there is no process to receive the message.
A few things follow from this architecture:
The gateway is stateless — it does not queue messages. If the bot is stopped, your request fails immediately. There is no retry or buffering.
Token rotation is by design — each VM boot generates a fresh token, which is good for security (limits the window if a token leaks) but inconvenient for automation.
The gateway is single-tenant — it serves only your bots. There is no multi-user access control beyond the Bearer token.
Performance is local — since the gateway runs on the same VM as the bots, the only latency you experience is the Tailscale tunnel (~4ms). The gateway-to-bot communication is effectively zero-latency.
Understanding this also explains why some endpoints are missing. The gateway was built for the desktop app's needs, not for external automation. Features like "start a stopped bot" or "subscribe to events" would require changes to the bot runtime, not just the gateway.
Shell Wrapper Functions
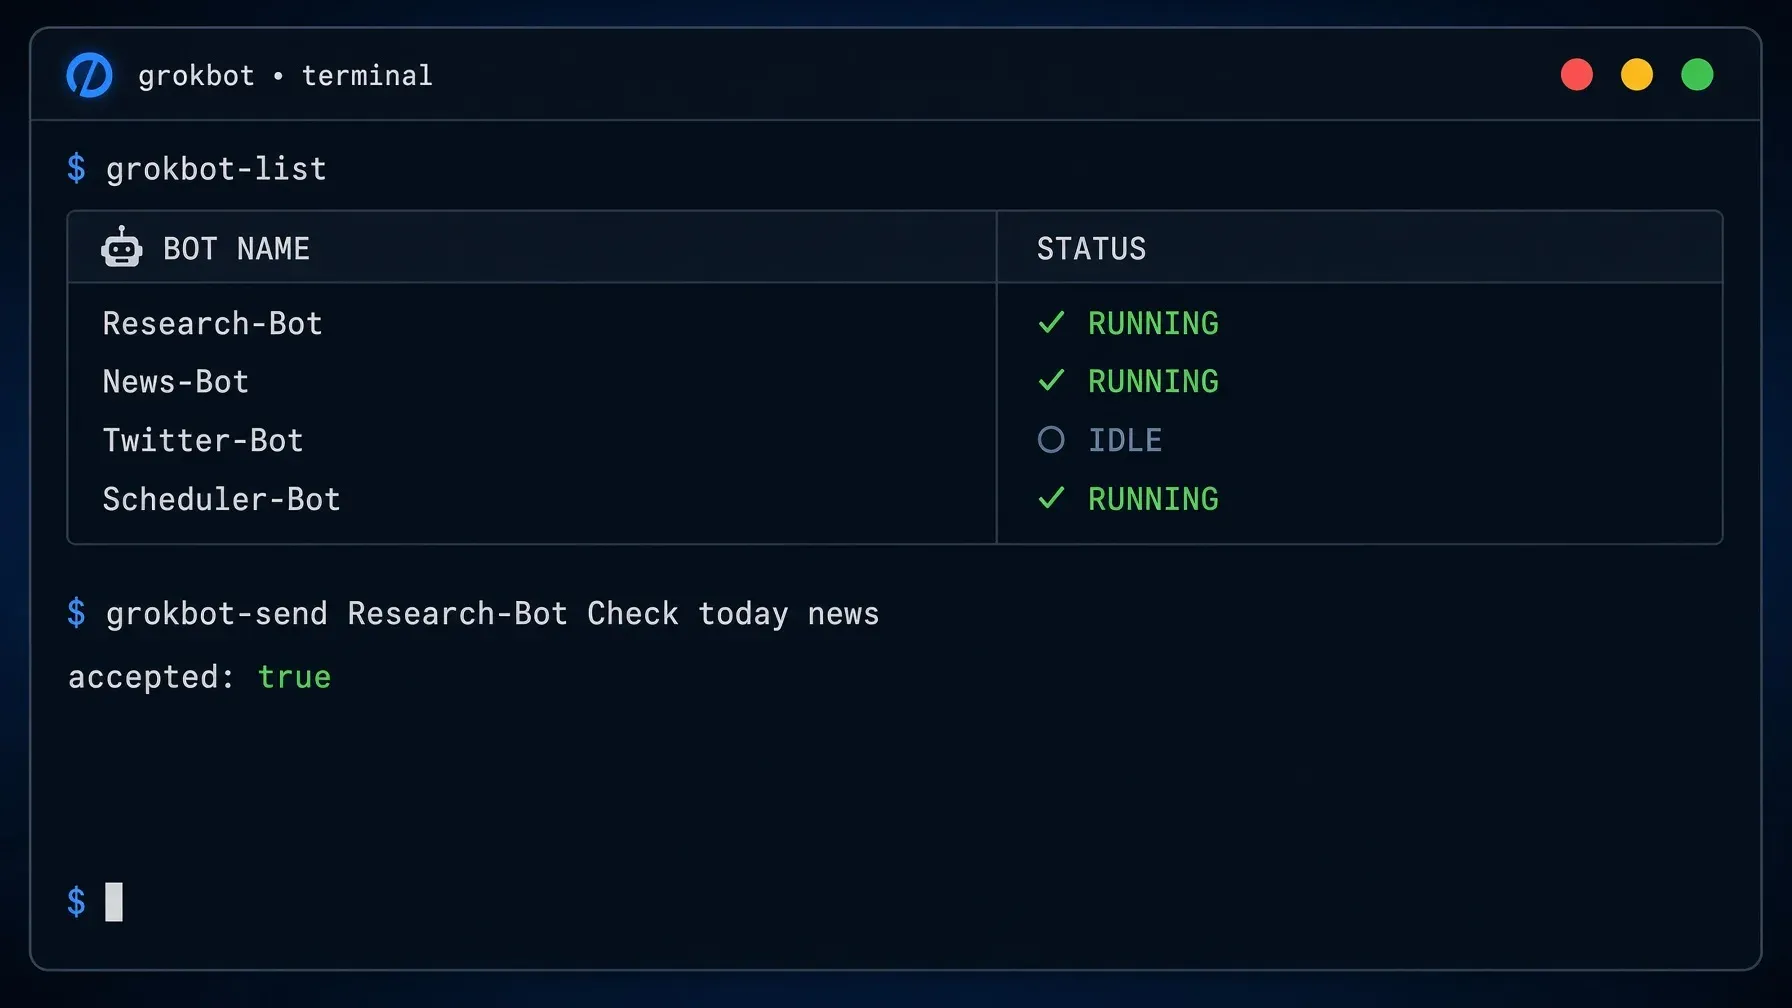
Typing full curl commands gets old fast. I wrapped the two most common operations into shell functions and added them to ~/.zshrc:
The same pattern works for any other endpoint — getTranscript, createAgent, getAgentMemories. Replace the path and request body, keep the auth header.
Usage:
grokbot-list
# Research Assistant          running  a1b2c3d4-...
# Email Checker               stopped  e5f6g7h8-...

grokbot-send "a1b2c3d4-..." "Summarize today's AI news"
# {"accepted":true}
Security Design
Running a tunnel from your Mac into a cloud VM deserves a clear-eyed look at the security model.
What Tailscale Gives You
Tailscale builds on WireGuard, which means all traffic between your Mac and the VM is encrypted with modern cryptography (ChaCha20-Poly1305). The connection is peer-to-peer when possible — traffic does not route through Tailscale's servers.
Neither machine opens a port to the public internet. Tailscale handles NAT traversal through its coordination server (which only exchanges connection metadata, not data).
The gateway token authenticates API calls. It is generated by xAI's infrastructure on the VM and never needs to leave the encrypted tunnel. No token is sent over the public internet.
What You Should Lock Down
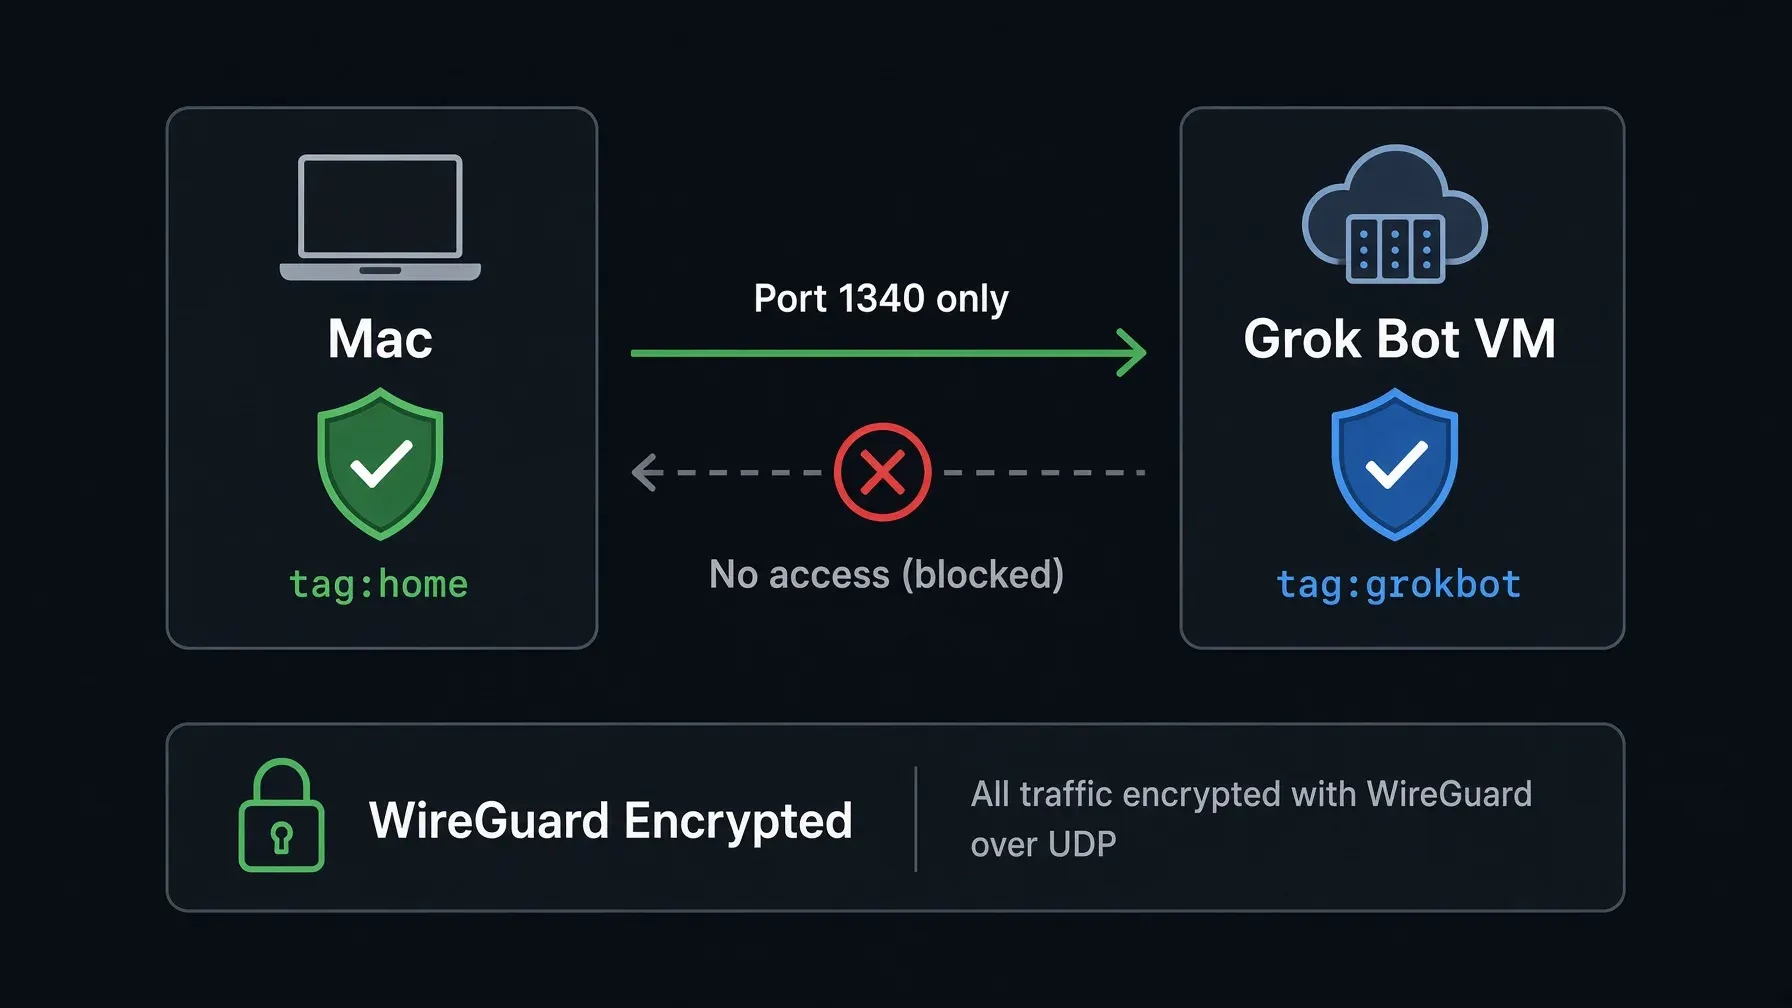
By default, Tailscale allows all devices in your tailnet to reach each other on all ports. For this use case, you only need your Mac to reach port 1340 on the VM. Everything else should be blocked.
sudo tailscale up --auth-key=tskey-auth-... --hostname=grokbot-vm --advertise-tags=tag:grokbot
This ACL configuration means:
Your Mac (tagged tag:home) can reach port 1340 on the VM. That is it.
The VM cannot reach your Mac at all. The access is strictly one-way.
No other device in your tailnet can reach the VM.
What This Does Not Protect Against
The gateway token on the VM is stored in a plain JSON file. Anyone with terminal access to the VM can read it. This is an inherent limitation of the setup — the VM is managed by xAI, and you are trusting their infrastructure to isolate your environment.
The API endpoints are undocumented. There is no rate limiting, no audit logging, and no OAuth. If the token leaks, anyone who can reach your tailnet can control your bots.
Recovery After VM Restart
Grok Bot's cloud VM gets rebuilt periodically by xAI. When this happens, Tailscale is gone because it was installed in the previous VM instance. The gateway token also changes because it is generated fresh on each VM boot.
Recovery takes about 30 seconds:
Open Grok Bot app → My Computer → Terminal
Reinstall and start Tailscale:
curl -fsSL https://tailscale.com/install.sh | sh
sudo tailscaled &
sleep 3
sudo tailscale up --auth-key=tskey-auth-YOUR_KEY_HERE --hostname=grokbot-vm
Confirm the IP (it usually stays the same):
tailscale ip -4
Get the new token:
cat /home/box/sand-data/gateway.json
Update GROKBOT_TOKEN on your Mac if the token changed.
Semi-Automatic Recovery with .profile
You can add the Tailscale startup commands to the VM's login profile so they run automatically when you open the terminal:
cat >> /home/box/.profile << 'EOF'

# Auto-start Tailscale for external access
if ! command -v tailscale &>/dev/null; then
  curl -fsSL https://tailscale.com/install.sh | sh 2>/dev/null
fi
if ! tailscale status &>/dev/null 2>&1; then
  sudo tailscaled &>/dev/null &
  sleep 3
  sudo tailscale up --auth-key=tskey-auth-YOUR_KEY_HERE --hostname=grokbot-vm 2>/dev/null
fi
EOF
After this, opening the "My Computer" terminal in the Grok Bot app automatically starts Tailscale. You still need to check gateway.json for the new token if it changed.
Monitoring with a Bot Routine
If you have a Grok Bot routine (a bot that runs on a schedule), you can use it to check Tailscale status and restart it if needed. Create a bot with instructions like:
Check if Tailscale is running by executing tailscale status. If it returns an error, run the startup sequence: sudo tailscaled &, wait 3 seconds, then sudo tailscale up --auth-key=tskey-auth-... --hostname=grokbot-vm.
This gives you a self-healing setup where the VM reconnects to your tailnet automatically, even after a rebuild, as long as the routine is scheduled.
Integrating with Other Tools
The real value of terminal access is not typing curl commands by hand. It is connecting Grok Bot to everything else on your machine.
From Claude Code
If you use Claude Code (or any CLI-based AI agent), you can call grokbot-send from a Bash tool call:
grokbot-send "a1b2c3d4-..." "Research the latest changes to the OpenAI API and write a summary"
This lets Claude Code delegate research tasks to Grok Bot agents, each specialized for different domains. The pattern is powerful: Claude Code handles code, Grok Bot handles research, and the shell glues them together.
You can also read back what a bot did by calling grokbot-transcript:
grokbot-transcript "a1b2c3d4-..."
# [user      ] Research the latest changes to the OpenAI API
# [assistant ] I'll search for recent OpenAI API changes...
# [tool      ] web_search: "OpenAI API changes August 2026"
# [assistant ] Here are the key changes from the last week...
From a Cron Job
Schedule a daily task that sends a briefing request to a bot every morning:
# In your crontab (crontab -e):
0 8 * * * /bin/zsh -c 'source ~/.zshrc && grokbot-send "UUID" "Generate my daily briefing: top AI news, upcoming meetings, and pending PRs"'
The bot runs the task in Grok Bot's environment and you can read the results later from the transcript. To save the transcript to a file after giving the bot time to finish:
# Run 10 minutes after the task dispatch:
10 8 * * * /bin/zsh -c 'source ~/.zshrc && grokbot-transcript "UUID" > ~/briefings/$(date +\%Y\%m\%d).txt'
From a Script
Any language that can call shell commands works. In Python, subprocess.run(["grokbot-send", bot_id, prompt]) sends a task; subprocess.run(["grokbot-list"]) checks status. You can dispatch to multiple bots, wait, and collect transcripts — the shell functions handle the HTTP plumbing.
Troubleshooting
Symptom
Likely cause
How to fix
curl hangs or times out
Tailscale not connected on one or both ends
Run tailscale status on your Mac and on the VM. Both should show as connected.
curl: (52) Empty reply from server
Target bot has isRunning: false
Open the bot's conversation window in the Grok Bot app
401 Unauthorized
Gateway token expired (changes after VM restart)
On the VM: cat /home/box/sand-data/gateway.json → copy new token
{"error":"not found: GET /"}
Using GET instead of POST, or wrong path
All endpoints use POST. Paths start with /api/ (e.g. /api/listAgents)
Run from the "My Computer" terminal, not from a bot's terminal
listAgents returns empty array
No bots created yet
Create a bot in the Grok Bot app first, or use createAgent
New token but curl still fails
Old token cached in environment variable
Run export GROKBOT_TOKEN="new-token" or open a new terminal after updating ~/.zshrc
Known Limitations
Cannot wake stopped bots — sendPrompt only delivers messages to bots with isRunning: true. You have to open the bot's conversation window in the app before sending from the terminal. There is no API to start a bot remotely.
Tailscale does not survive VM rebuilds — when xAI rebuilds the VM, everything installed on it is gone. You need to reinstall Tailscale from the terminal. The .profile trick helps, but you still need to open the terminal at least once.
Token rotates on restart — the gateway token in gateway.json changes every time the VM restarts. There is no way to set a persistent token.
Undocumented and unsupported — these endpoints are not part of any public API. They could change or disappear with any Grok Bot app update. Do not build production-critical systems on top of this without a fallback plan.
One VM per account — each Grok Bot subscription gets one cloud VM. You cannot scale horizontally by adding more VMs.
Tailscale SSH conflicts with port 22 — if you enable Tailscale SSH on the VM (sudo tailscale set --ssh), Tailscale intercepts port 22. Any openssh-server you install on the VM needs to listen on a different port (e.g. 2222) to avoid the conflict.
Official alternative on the roadmap — Cursor has confirmed they are working on webhook-based inbound triggers for bots. When that ships, the Tailscale tunnel approach can retire in favor of a supported integration.
FAQ
Does Grok Bot have an official API?
No. As of August 2026, there is no public API. The internal gateway on port 1340 is undocumented and unsupported. Cursor has stated they are planning webhook support, but there is no timeline.
Do I need a paid Tailscale plan?
No. The free personal plan supports up to 100 devices. You only need your Mac and the VM — two devices.
What happens when the VM restarts?
Tailscale stops and the gateway token changes. Recovery takes about 30 seconds: reinstall Tailscale, rejoin the tailnet, and grab the new token from gateway.json. The Tailscale IP usually stays the same.
Can I wake a stopped bot with sendPrompt?
No. The bot must have its conversation window open in the app (isRunning: true). There is no API endpoint to start a stopped bot.
Is the traffic between my Mac and the VM encrypted?
Yes. Tailscale uses WireGuard, which encrypts all traffic end-to-end. The gateway token travels only inside this encrypted tunnel.
Will Tailscale break my existing VPN or proxy setup?
Tailscale creates a lightweight system network interface that coexists with most VPN and proxy setups. It only routes traffic for the 100.64.0.0/10 range (Tailscale IPs) and leaves everything else alone. In practice, I have not seen it conflict with any common proxy configuration, but test it if you run an unusual setup.
Can I run this on Linux or Windows?
The setup should work on any OS that has a Tailscale client. The VM side is identical (it is Linux). Tailscale runs on Mac, Windows, and Linux, so the only platform-specific step is the Tailscale install command.
What Comes Next
This guide gets you from zero to sending terminal commands to Grok Bot agents. A few directions worth exploring:
Scheduled automation — cron jobs that send daily tasks to specialized bots and collect their outputs via getTranscript
Multi-agent orchestration — a controller script that dispatches subtasks to different bots, waits for completion, and assembles the results
Cross-agent integration — Claude Code or other coding agents dispatching research, testing, or monitoring tasks to Grok Bot agents
Status dashboard — a script that polls listAgents and surfaces which bots are running, their last activity, and any errors
Memory management — periodic scripts that audit and clean up bot memories to prevent context pollution
SSH direct access — once Tailscale is running on the VM, you can install openssh-server (on port 2222 to avoid conflicting with Tailscale SSH) and get full SSH access to the VM, including scp for file transfers
The unofficial API is stable enough for personal automation. Just keep two things in mind: back up your flows so you can rebuild quickly after a VM reset, and watch for Grok Bot app updates that might change the endpoints.
When Cursor ships official webhook support, the Tailscale tunnel becomes unnecessary. Until then, this works.
Gloves on, tape measure in hand — nobody types a query. Three voice surfaces for ai automation tools (terminal, Telegram, Discord), 10 TTS and 6 STT providers compared on cost and latency, plus a setup that costs nothing.
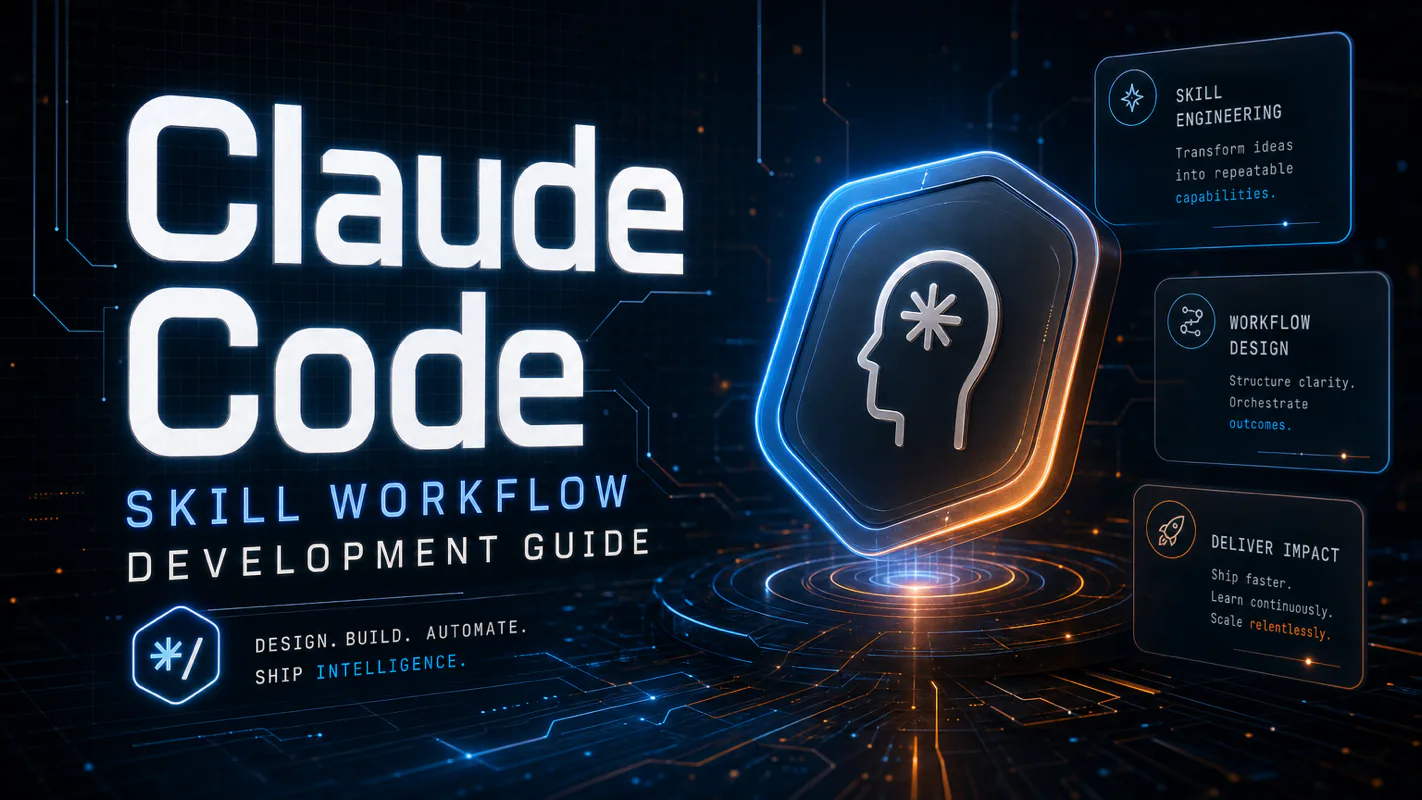
A Skill is an operating manual, not a plugin. The five-layer architecture behind workflow automation that survives context compression, session crashes, and handoffs: SKILL.md as the single entry point, deterministic scripts, run state for crash recovery, and a resource layer.
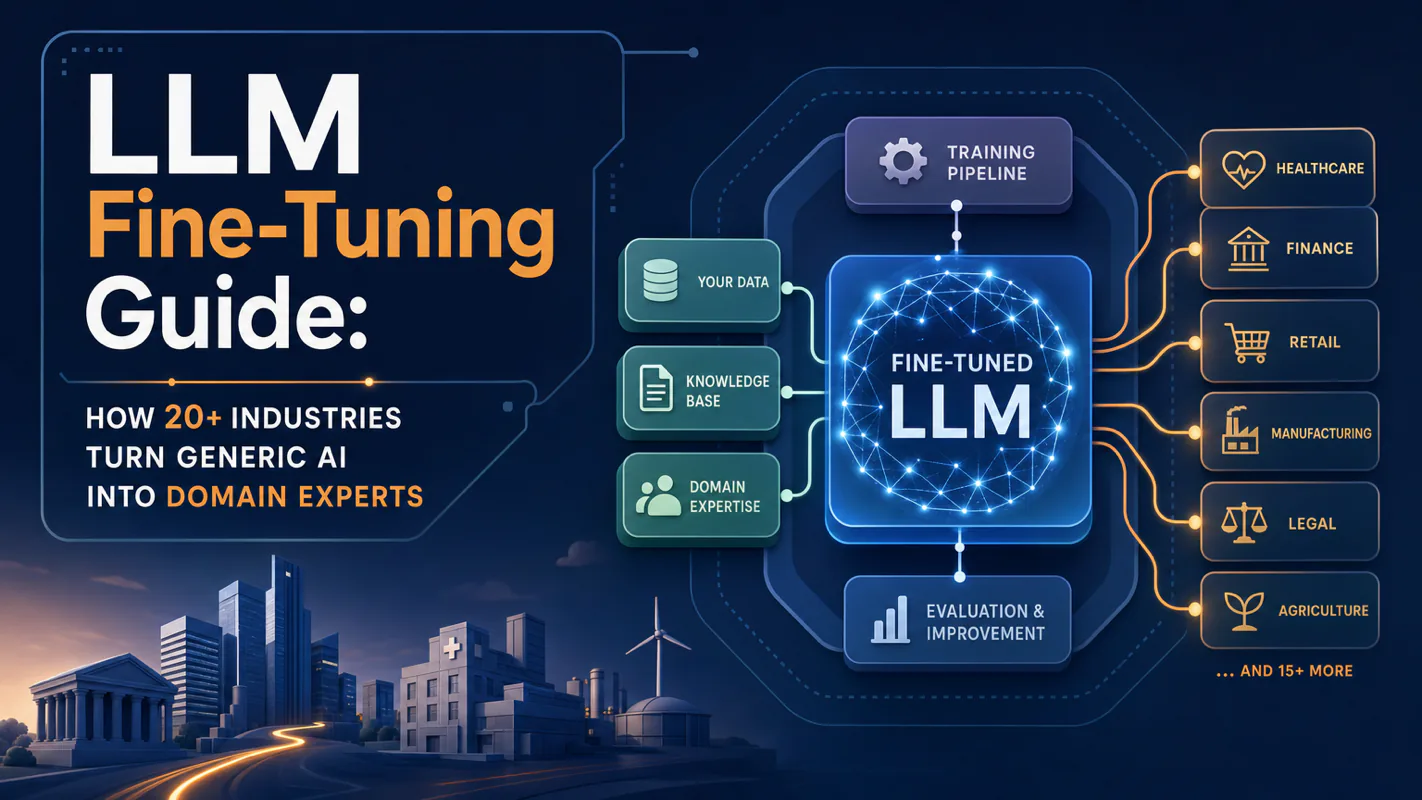
Two of the three fixes can be undone the same afternoon. The third cannot, and it is the one people reach for first. LoRA cut costs tenfold, which made the expensive option tempting rather than correct. In business process automation, the order you try things in is the whole decision.
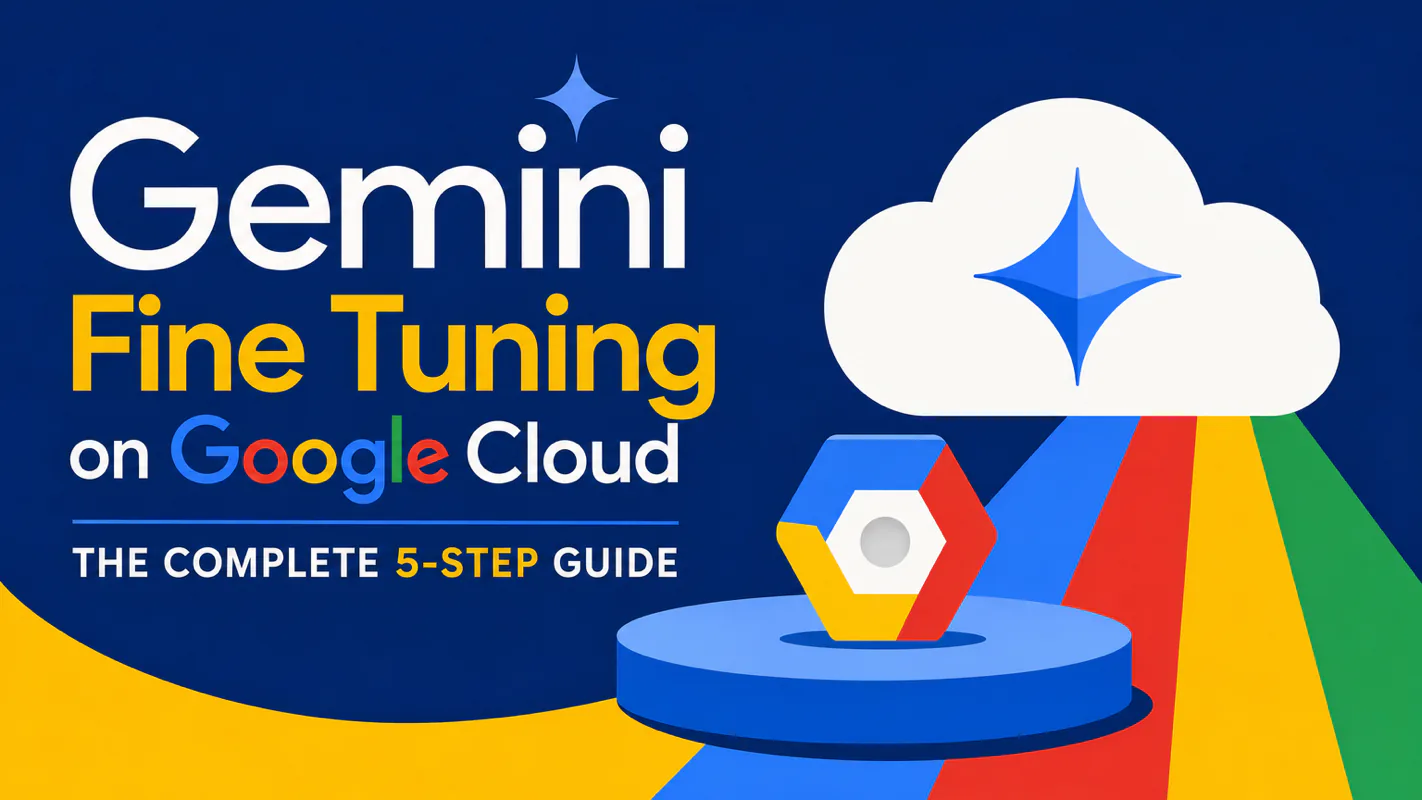
Fine tuning turns a generalist into a specialist - skip the baseline and you can never prove it worked. Five steps on Google Cloud: baseline, data prep, instruction design, hyperparameters, evaluation. Plus the finding that surprises business process automation buyers: 100 good samples beat 1,000.